PyTorchで画像をリサイズ(拡大・縮小)するには、torchvision.transforms.functional.resizeを使う。
サンプル画像をWEBからダウロード、保存します。
- 関連記事 – 【最速】PythonでWEB上の画像をダウンロードして保存する【Requests】
- 関連記事 – PyTorchでjpeg/png画像を読みこむread_image、保存するwrite_jpeg/write_png
import requests
import matplotlib.pyplot as plt
from torchvision.io import read_image

url = "https://github.com/opencv/opencv/blob/master/samples/data/butterfly.jpg?raw=true"
file_name = "butterfly.jpg"

response = requests.get(url)
image = response.content

with open(file_name, "wb") as f:
    f.write(image)

image = read_image(path=file_name)
print(image.shape)
# torch.Size([3, 356, 493])

plt.imshow(image.permute(1,2,0));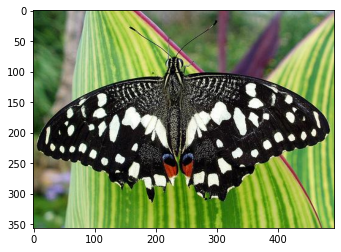
torchvision.transforms.functional.resize
第一引数imgにリサイズする画像をTensor配列で、sizeにリサイズ後の画像サイズを(高さ, 幅)で指定する。
import torchvision.transforms.functional as F

image_re = F.resize(img=image, size=(100, 200))
print(image_re.shape)
# torch.Size([3, 100, 200])

plt.imshow(image_re.permute(1,2,0));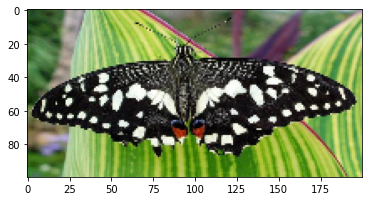
リサイズ時の補間方法について
リサイズ時の補間方法は、デフォルトでInterpolationMode.BILINEARが指定されている。他の補間方法を使いたい場合は、第三引数のinterpolationに指定する。指定できる補間方法は以下3つである。
- InterpolationMode.BILINEAR
- InterpolationMode.NEAREST
- InterpolationMode.BICUBIC
import torchvision.transforms as T

image_re = F.resize(img=image, size=(100, 200), interpolation=T.InterpolationMode.BILINEAR)

image_re = F.resize(img=image, size=(100, 200), interpolation=T.InterpolationMode.NEAREST)

image_re = F.resize(img=image, size=(100, 200), interpolation=T.InterpolationMode.BICUBIC)
関連記事、参考記事
PyTorch公式ページでも紹介されていた本で、「Tensorの仕組み」から「ディープラーニングの実践プロジェクト:肺がんの早期発見」までステップバイステップで説明しているため、中身をよく理解できます。
コメント